🔩 Keep Your Bits Sharp, Your Projects Sharp-er!
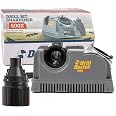
The Drill Doctor DD500X is an electric sharpener designed to sharpen twist drill bits ranging from 3/32" to 1/2". With adjustable angles of 118° or 135°, it enhances cutting performance and reduces wear. Backed by a 3-year warranty, this portable sharpener is engineered in Oregon, ensuring high-quality craftsmanship for both professionals and DIY enthusiasts.


F**
Must have for any working shop of hobbyist.
Wow, I should’ve bought this a long time ago. I am a machinist with a lot of drills and I use one or another everyday. I have number drills, fractional drills, letter drills in machinist and jobber lengths, and metric drill all in indexes. Also, a drawer with another 50 or so miscellaneous bits that are old and worn. Within 10 mins of opening the Drill Doctor I figured out how to get perfect profile, super sharp tips on old and used drills. Amazing! Sooo worth the money. Mine came with a diamond/ceramic knife sharpener too that works great. Such a deal!
B**.
worked good
great
D**S
Seems ok
Seemed to work ok but haven't sharpened but a few drill bits
D**7
Best ever
I have used several bit sharpener in the past and gave up on them very fast. The Drill Doctor 500x is perfect I can't believe how easy it is to get dull bit to be like new. l will recommend this tool to all my retired friends.
S**N
The quality of the product was great.
Great product
T**.
compact drill bit sharpener that is easy to use and has great results
After reading the instruction booklet I found the on line video to be very helpful. I found it easy to operate and the performance was great
K**N
Simple and accurate for the home workshop. Excellent value
I am surprised to be giving this a 5star rating, I didn't expect it to be this nice of a tool.This is an easy setup, guick to use and seems very consistent.I think a person could get to 1 bit per minute or less once all the bits have been run through so you have a consistent starting angle. I have 150 bits and so many different angles exist from years of past hand sharpening and using less exacting sharpening tools all of which need to be "corrected" to a common angle which sometimes causes you to reset the depth a couple times before the whole tip is consistent.Once there, I think a bit/min would be doable without much effort as long as the bits are just dull and not damaged requiring extra passes.I did 3 in two minutes including running them thru the point splitter after they were sharp.Overall this is a homerun for a shop or garage application where exacting tolerances aren't needed but sharp bits are.
A**E
No need to buy drill its ever again!
Just received this today and very pleased with this purchase. Despite some other reviewers comments, the instruction manual is comprehensive, easy to understand and fully explains the operation of the Drill Doctor. I had no trouble setting up for 118 or 135 degree point angles.I resharpened some 34 drill bits from 3/32" to 1/2" that were blunt and changed one from 118 degrees to 135 with a split point. It took about 1 hour and 15 mins in total. After, they all were sharp, exactly to specification and cut through wood and steel like they were brand new. The 135 deg split point drill bit I cut (5/16") produced the perfect Curly Q's as shown in the photo, when cutting through a 1/4" mild steel bar with my drill press.I've always tried to hand grind my drills or bought new. While they were fairly sharp and drilled OK after my hand grinding, they certainly looked hand-ground and weren't like a new drill bit with a well-defined chisel edge, relief angle, even cutting edges and a perfect point angle. With a couple minutes work in the Drill Doctor, I have perfect bits.Points to note:- The 135 deg point angle setting is the one notch to the right of the 12 o'clock positioned 118 degree notch in the alignment port. The other 10 deg notches are to fine tune the chisel edge and relief angles, which 99 times out of a 100, you won't need to adjust.- Make sure the spring steel jaws in the alignment port snap into the drill at its narrowest point across the width of the flutes. Rotate the drill bit as required to make this happen. This ensures the correct angular position of the bit in the chuck for grinding.- After finger snugging the bit in the chuck in the alignment port, remove it and hand tighten. That way the drill doesn't move from its perfect alignment for grinding.- Keep rotating the chuck in the grinding port with light pressure down and keeping the chuck against the cam pin, grinding until the grinding sounds stop occurring. The bit at that point is fully ground.- Eventually the grinding wheel will wear down. You can remove it and turn it around to get another 100 or so drills sharpened before having to replace the wheel for about $20. After doing all my 34 drills, I could feel that the roughness of the grinding wheel was less that the other unused end, but it was still easily capable of grinding bits.- Grinding dust does spill out onto the bench through the gaps around the transparent cover under the grinding wheel. After all my bits, I had a tiny heap on the table, with more inside the machine. I cleaned the Drill Doctor before putting it away, per the instructions.- Don't mash the bit into wheel, especially for making the split point. Treat it gently and pulse it until the sound stops.I've now got a way to have sharp drill whenever I need them. I always had to make do or go buy yet another drill bit.The Drill Doctor is not a cheap tool, but it is well-made and sturdy. Once you have it, you can really appreciate its value. No regrets at all. I will never need to buy bits again until I've worm them down to an unusable length and by then, that will have paid back the cost of the Drill Doctor many times over!
Trustpilot
5 days ago
2 weeks ago